Sunday, June 29, 2014

Optimize way to check empty String in Java

In this post, we'll see the best practice and optimize way to check empty String in Java. Every developer know how to check empty String but here we'll look into the optimized method of checking empty String. 

Most of us always prefer to use equals() method to check for empty String such as


However, this equals() method is overkill to test for an empty String. It is quicker to test if the length of the String is 0. So, the best way to check for empty String is 


How to prove that second option is the optimized way to check for empty String? 
For this, I have done micro-tuning. Micro-tuning should always start with a baseline measurement. The most basic tool in the tuner's armory is the System.currentTimeMillis() method, which returns the current time in milliseconds, as a long data item. This method returns the time offset from some starting time, but we don't actually care what that starting time is because we will use the currentTimeMillis() method to measure a time difference, the elapsed time between the start and end of our test


5 test result : 
Test run 1
Time in Mili Sec to length : 60
Time in Mili Sec to equals : 120
Test run 2
Time in Mili Sec to length : 53
Time in Mili Sec to equals : 98
Test run 3
Time in Mili Sec to length : 62
Time in Mili Sec to equals : 101
Test run 4
Time in Mili Sec to length : 54
Time in Mili Sec to equals : 89
Test run 5
Time in Mili Sec to length : 65
Time in Mili Sec to equals : 118

String.equals() is expensive if you are only testing for an empty string. It is quicker to test if the length of the string is 0.
Reason is that, since String class is immutable so there length is cached where in case of equals() a lot of statements need to be executed to know whether string is empty or not.
Onward Java 6, isEmpty() method of String is use for the same purpose.

What about if String is NULL?
In this case, you can add one condition of null check before checking length of the String. For instance,


Download CodeEmptyString EmptyStringWithNull


If you know anyone who has started learning Java, why not help them out! Just share this post with them. Thanks for studying today!...

Friday, June 27, 2014

How CopyOnWriteArrayList works internally in Java

CopyOnWriteArrayList | ArrayList Java
In this article, we will see one of the most important concurrent collection class CopyOnWriteArrayList and we also look into the working of CopyOnWriteArrayList class including its comparison with ArrayList and in which situation CopyOnWriteArrayList should be preferred over ArrayList.


Few Drawbacks of ArrayList
  • If multiple threads access an ArrayList instance concurrently, and at least one of the threads modifies the list structurally, it must be synchronized externally.Means whenever there is access or modification we need synchronization that is a overhead.
  • The iterator will throw a ConcurrentModificationException


What is copy-on-write concept
Copy-on-write is an optimization strategy used in computer programming. Copy-on-write stems from the understanding that when multiple separate tasks use identical copies of the same information, it is not necessary to create separate copies of that information for each process, instead they can all be given pointers to the same resource. When there are many separate processes all using the same resource it is possible to make significant resource savings by sharing resources this way. However, when a local copy has been modified, the copy-on-write paradigm has no provision that the shared resource has in the meantime not been updated by another task or tasks.
So Copy-on-write is therefore only suggested if only the latest update is important and occasional use of a slightly stale value is not harmful. Copy-on-write is the name given to the process of identifying when a task attempts to make a change to the shared information, creating a separate (private) copy of that information for the task and redirecting the task to making changes to the private copy to prevent its changes from becoming visible to all the other tasks


CopyOnWriteArrayList
As the name suggest, "copy on write" means whenever there is write operation such as add, set and so on. it copies the underlying array. So it is a thread-safe variant of ArrayList in which all mutative operations (add, set, and so on) are implemented by making a fresh copy of the underlying array. So basic idea is whenever we add or remove to the CopyOnWriteArrayList, the underlying array is copied with the modification. Remember this point, we'll see shortly in the code how CopyOnWriteArrayList do this.
It means, whenever there is modification done by thread that update the ArrayList, all other threads holding an older copy of different array. This is ordinarily too costly, but may be more efficient than alternatives when traversal operations vastly outnumber mutations, and is useful when you cannot or don't want to synchronize traversals, yet need to preclude interference among concurrent threads.

This completes our basic understanding what is the need CopyOnWriteArrayList compared to ArrayList. Now we'll look into the code of CopyOnWriteArrayList to see how it implements the same concept.


Working of CopyOnWriteArrayList


If you see the underlying array reference is marked as volatile so that readers do not need to use a lock to see changes to the referenced array which means array update is an atomic operation and hence reads will always see the array in a consistent state. When a write operation occurs this volatile reference is only updated in the final statement via setArray() method. Up until this point any read operations will return elements from the old copy of the array. 
Also, the write lock is required to prevent concurrent modification, which may result the array holding inconsistent data or changes being lost

Advantage of volatile
Using volatile variables reduces the risk of memory consistency errors, because any write to a volatile variable establishes a happens-before relationship with subsequent reads of that same variable. This means that changes to a volatile variable are always visible to other threads. What's more, it also means that when a thread reads a volatile variable, it sees not just the latest change to the volatile, but also the side effects of the code that led up the change. Here volatile only applies to the array reference itself, not to the content of the array.

add(E e) method


If you notice in the above code, lock is acquired before adding the element in line 415 and getArray() is called which returned the underlying array which is declared volatile. After copying and modification the array is updated using the setArray() method, finally release the lock. This same concept applies to all the modification operations.

Iterator of CopyOnWriteArrayList
Iterator use "snapshot" style method uses a reference to the state of the array at the point that the iterator was created. Iterator of CopyOnWriteArrayList is fail-safe and doesn't throw ConcurrentModificationException even if underlying CopyOnWriteArrayList is modified once iteration begins because iterator is operating on separate copy of ArrayList. Consequently all the updates made on CopyOnWriteArrayList is not available to iterator.

How to get the most updated version of array
To get the most updated version do a new read like list.iterator(). Let's have a look to understand it more


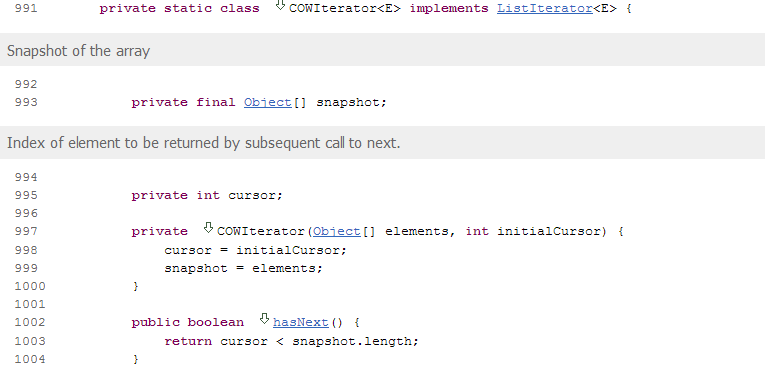
In the above code, if you notice it call the getArray() method to return the iterator which always return the updated version of array. COWIterator implements the ListIterator.

How ArrayList throw ConcurrentModificationException
First, we will see the code of iterator of both ArrayList and CopyOnWriteArrayList from that we analyzed how ArrayList throw exception.

CopyOnWriteArrayList  Iterator


ArrayList Iterator


Here modCount is the ArrayList variable that holds the modification count and every time we use add, remove or trimToSize method, it increments. expectedModCount is the iterator variable that is initialized when we create iterator with same value as modCount. This explains why we don’t get exception if we use set method to replace any existing element. So basically iterator throws ConcurrentModificationException if list size is changed. Which is not the case with next() function of CopyOnWriteArrayList because we have the copy of array and no other thread will modify the same array.
Sometimes we want to add or remove elements from the list if we find some specific element, in that case we should use Concurrent Collection class – CopyOnWriteArrayList. 

When CopyOnWriteArrayList is preferred
A CopyOnWriteArrayList is preferable to a synchronized ArrayList when the expected number of reads and traversals greatly outnumber the number of updates to a list.


Examples of CopyOnWriteArrayList and ArrayList


If you know anyone who has started learning Java, why not help them out! Just share this post with them. Thanks for studying today!...

Thursday, June 26, 2014

Linked List implementation of Queue Data Structure in Java

Linked List implementation of Queue Data Structure in Java
A Queue is a data structure for storing data similar to Linked List and Stack. In Queue, the order in which data arrives is important. In general, a queue is a line of people or things waiting to be served in sequential order stating at the beginning of the line.

A queue is an ordered list in which insertions are done at one end (rear) and deletion done at other end (front). The first element to be inserted is the first one to be deleted. Hence, it is called as First in First Out(FIFO) or Last in Last Out (LILO).

This is some what similar to Stack. When an element is inserted in a queue, the concept is called EnQueue and when an element is removed from the queue, the concept is called DeQueue.Trying to DeQueue an empty Queue is called as underflow and trying to EnQueue an full queue is called overflow. Generally, we treat them as exceptions.

Queue Operations
Main Operations

  • enQueue(int data) : Insert an element at the end of the queue
  • deQueue() : Removes and element an element at the front of the queue
Auxiliary Operations
  • int Front() : Returns the element at the front without removing it.
  • int QueueSize() : Returns the queue size.
  • int isEmpty() : Indicates whether element are stored.


Implementation of Queue
Linked List is one of the implementation of Queue, in which EnQueue operation is implemented by inserting element at the end of the list and DeQueue operation is implemented by deleting an element from the beginning of the list.


Source : wikipedia


Queue Exception class


For ListNode class refer Linked List

Queue


Demo 
4
4
8
2

Complexity
Space Complexity : O(n)
Time Complexity : enQueue and deQueue operations O(1)

Download Code : QueueException Queue QueueDemo


If you know anyone who has started learning Java, why not help them out! Just share this post with them. Thanks for studying today!...

Wednesday, June 25, 2014

Implementation of Two Stacks with one Array in Java

Two Stacks with one Array in Java
This is the continuation of previous post on Array implementation of stack in java. In this post, we implements 2 stacks using one array.

While implementing stack using array we took one index which first initially point to -1, In this case of 2 stacks we take two index one point to -1 and other point to the end of the array i.e, size of the array.

Algorithms :

  • Start with two indexes one at the left and other at the right end of the array.
  • Left index simulate the first stack and second index simulate the right stack.
  • If we want to put the element in the first stack then put the element at the left index. Similarly, if we want to put the element in the second stack then put the element at the right index.
  • First stack grow towards left and second stack grow towards left.


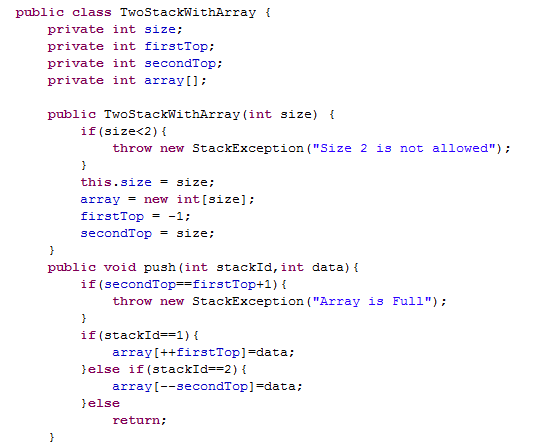
Custom Stack Exception Class


Stack Class


Demo


6
Stack 1 is full
Stack 2 is full

Complexity 
Space Complexity : O(1)
Time Complexity : Push and Pop operation O(1)

Download Code : StackException TwoStackWithArray TwoStackWithArrayDemo

If you know anyone who has started learning Java, why not help them out! Just share this post with them. Thanks for studying today!...

Tuesday, June 24, 2014

Linked List implementation of Stack Data Structure in Java

A stack is a simple data structure for storing data. In stack, the order in which the data arrives is important. A pile of books is a good example of stack. A stack is an ordered list in which insertion and deletion are done at one end, where end is called top. The last element inserted is the first one to be deleted. Hence, it is called Last in First Out (LIFO) or First in Last Out (FILO) list

In this post, we'll see the other way of implementing Stack is by Linked List. This is continuation of the previous post about Array implementation of Stack
In this implementation, push operation is implemented by inserting element at the beginning of the list. Pop operation is implemented by deleting the node from the beginning.
Even you can throw exception instead of printing message in case of pop operation when stack is empty.

Demo
9
8
7
7
false


Generic Implementation of Stack as Linked List
ListNode

Generic Stack

Demo

Performance and Limitations
Performance : Let n be the number of elements in the stack.

  • Space Complexity  for n push operations : O(n)
  • Time Complexity of push : O(1)
  • Time Complexity of pop : O(1)
  • Time Complexity of isEmpty : O(1)
  • Time Complexity of isStackFull : O(1)
  • Time Complexity of deleteStack : O(1)

Limitations : The size of the stack must be defined in prior and cannot be changed.


Download code : ListNode LinkedStack LinkedStackDemo  GenericListNode GenericLinkedStack GenericStackDemo


If you know anyone who has started learning Java, why not help them out! Just share this post with them. Thanks for studying today!...

Monday, June 23, 2014

Array implementation of Stack Data structure in Java

A stack is a simple data structure for storing data. In stack, the order in which the data arrives is important. A pile of books is a good example of stack.
A stack is an ordered list in which insertion and deletion are done at one end, where end is called top. The last element inserted is the first one to be deleted. Hence, it is called Last in First Out (LIFO) or First in Last Out (FILO) list

In computer science, a stack is a particular kind of abstract data type or collection in which the principal (or only) operations on the collection are the addition of an entity to the collection, known as push and removal of an entity, known as pop. Often a peek or top operation is also implemented, returning the value of the top element without removing it.

Stack Operations
Main operations

  • void push(int data) : Insert data onto stack.
  • int pop() : Removes and returned last inserted element from the stack
Auxiliary operations
  • int top() or peek() : Returns the last inserted elements without removing it.
  • int size() :  Returns the number of elements stored in stack.
  • boolean isStackFull() : Check whether stack is full or not.
  • boolean isEmpty() : Check whether stack is empty or not.


Implementation of stack
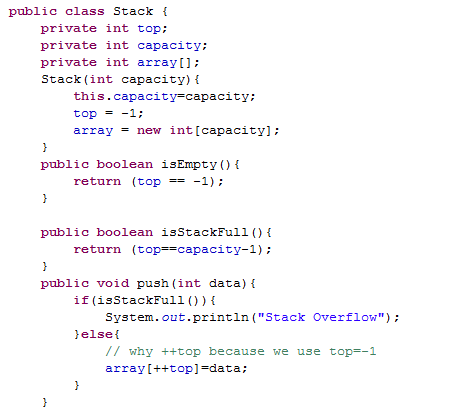
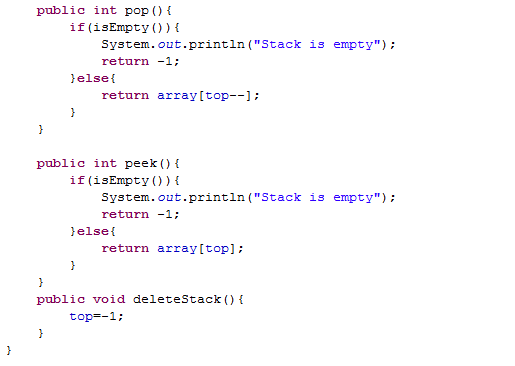
In this implementation, we add element from left to right and use a variable to keep track of the index of the top element.

The array storing the stacks may become full. A push operation will the throw error or message of stack over flow. Similarly, if we try to deleting an element from empty stack then it will throw error or message Stack is empty.


false
true
Pop() : 45
peek() : 13
Pop() : 13
Stack Overflow


Performance and Limitations
Performance : Let n be the number of elements in the stack.

  • Space Complexity for n push operations : O(n)
  • Time Complexity of push : O(1)
  • Time Complexity of pop : O(1)
  • Time Complexity of isEmpty : O(1)
  • Time Complexity of isStackFull : O(1)
  • Time Complexity of deleteStack : O(1)

Limitations : The size of the stack must be defined in prior and cannot be changed.

Applications
Stacks have numerous applications. We see stacks in everyday life, from the books in our library, to the blank sheets of paper in our printer tray. All of them follow the Last In First Out (LIFO) logic, that is when we add a book to a pile of books, we add it to the top of the pile, whereas when we remove a book from the pile, we generally remove it from the top of the pile.

  • Converting a decimal number into a binary number.
  • Towers of Hanoi
  • Expression evaluation and syntax parsing
  • Backtracking
  • Implementing functions calls
  • Page-visited history in a Web browser.
  • Undo sequence in a text editor.
  • Matching tags ing HTML and XML
Download Code : Stack  StackDemo 


If you know anyone who has started learning Java, why not help them out! Just share this post with them. Thanks for studying today!...

Sunday, June 22, 2014

Linked List implementation in Java

In this post, we'll see the basic of Linked List, its advantages and implementation in Java. 


Linked List is a data structure used for storing collection of data. It has the following properties:

  • Successive element are connected by pointers, in Java we means references.
  • Last element of Linked List point to NULL
  • Can grow or shrink in size during the execution of a program.
  • Can me long as long as required.
  • It does not waste memory space.

This is how Singly Linked List look like:


Each record of a linked list is often called an element or node.
The field of each node that contains the address of the next node is usually called the next link or next pointer. The remaining fields are known as the data.
The head of a list is its first node. The tail of a list may refer either to the rest of the list after the head, or to the last node in the list.
Singly linked lists contain nodes which have a data field as well as a next field, which points to the next node in line of nodes.

How the node of a Linked List look like:


How Linked List node look like in Java

How to add elements in a Linked List
There are basic 4 ways to add element in a linked list.
  • Insert element at the beginning of the Linked List.
  • Insert element at the end of the Linked List.
  • Insert element after a specific element in the Linked List.
  • Insert element before a specific element in the Linked List.


How to traverse a Linked List
Let us assume that the head pointer point to the first node of the list. To traverse the list we do the following:
  • Follow the pointer.
  • Display the content of the node as they traversed and move the pointer to next node.
  • Stop when next pointer point to NULL

Insert element at the beginning
In this case, a new node is inserted before the current head node. Only one next pointer needs to be modified. It can be done in two steps
  • Update the next pointer of new node to point the current head node.
  • Update the head pointer point to the next node.

Insert element at the ending
In this case, a new node is inserted at the end of linked list. Only one pointer needs to be modified. It can be done in two steps:
  • Move the head pointer (temp counter) to the last node.
  • Update the last node next pointer to the new node. 


Insert element before a specific element
In this case, a new node is inserted before a specific node. One pointer will be change if new node has be added before the head node, otherwise two pointer will be change. In this case, we take two pointer one will move behind the current pointer. It can be done in three steps:
  • Move the head pointer and previous pointer until specific element is found, else return by saying element not found.
  • If new node has be added before head node, update the the next pointer of new node to to head and point head to new node.
  • Update the previous pointer to new node and new node pointer to temp.


Insert element after a specific element
In this case, a new node is inserted before a specific node. One pointer will be change if new node has be added at the end, otherwise two pointer will be change. It can be done in three steps:
  • Move the head pointer until specific element is found, else return by saying element not found.
  • If new node has be added at the end, update the the head pointer of new node to the new node.
  • Update the new node pointer to next of current head node and head pointer to new node.
Linked List Insertion operation Demo:
41 40
41 40 43 44
41 40 43 100 44


How to delete elements from a Linked List
There are basic 4 ways to delete element in a linked list.
  • Delete element at the beginning of the Linked List.
  • Delete element at the end of the Linked List.
  • Delete element after a specific element in the Linked List.
  • Delete element before a specific element in the Linked List.

Delete element at the beginning
The deletion of head node is done in two steps:

  • Create a temporary node that point to same node as head.
  • Move the head pointer node to the next node and dispose the temporary node.

Delete element at the end
In this case, last node to be delete from the list. Here we need two pointer, prev and curr where prev pointer stop at the second last node and curr stop at the last node. This can be done in 3 steps:

  • Traverse the list and while traversing the list maintain the prev node pointer. By the time we reach at the end one pointer is pointing to the tail node and other is pointing the node before tail node.
  • Update the prev node next pointer to NULL.
  • Dispose the tail node i.e, curr node.

Delete element before a specific element
Here we take two pointer prev and curr and we iterate until we find the specific element. If prev is point to NULL, means we didn't find the element otherwise we check whether we need to delete the first node or not. It can be done in two steps:

  • Move the pointer until we find the specific element else return by saying Element not found for deletion.
  • If prev pointer point to first node, simply update the head otherwise go to next step.
  • Set the prev node next to the curr node next pointer.

Delete element after a specific element
This procedure is bit complicated, in this case we take two pointer one is currNode and other is nextNode means we move one step forward. If there is one no element or one element, we simply return otherwise we move until nextNode become null. If nextNode is null means we didn't find the element. If nextNode next pointer is null means it is the last node otherwise we point currNodex next pointer to nextNode next pointer.

Delete singly Linked List
While iterating the linked list we store current node in some temporary variable and freeing the current node. After freeing the current node go to the next node with temporary variable and repeat the process.


If you know anyone who has started learning Java, why not help them out! Just share this post with them. Thanks for studying today!...