Sunday, August 9, 2015

File Locking in Java

NIO supports file locking to synchronize access to a file. You have the ability to lock a region of a file or the entire file. The file locking mechanism is handled by the operating system and therefore its exact effect is platform-dependent. On some operating systems, a file lock is advisory, whereas on some, it is mandatory. Since it is handled by the operating system, its effect is visible to other programs as well as to Java programs running in other JVMs. In this article, we try to understand this concept with the help of an example.


There are two kinds of file locking:

  1. Exclusive lock  : Only one program can hold an exclusive lock on a region of a file
  2. Shared lock : Multiple programs can hold shared locks on the same region of a file

You cannot mix an exclusive lock and a shared lock on the same region of a file. If a program has a shared lock on a region, another program must wait to get an exclusive lock on that region and vice versa. Some operating systems do not support a shared file lock, and in that case, the request for a shared file lock is converted to a request for an exclusive file lock.


How to represent File Lock
An object of the FileLock class, which is in the java.nio.channels package, represents a file lock. You acquire a lock on a file by using the lock() or tryLock() method of the FileChannel object

  • The lock() method blocks if the lock on the requested region of the file is not available
  • The tryLock() method does not block; it returns immediately. It returns an object of the FileLock class if the lock was acquired; otherwise, it returns null.


Versions of lock() and tryLock() methods
Both lock() and tryLock() methods have two versions: one without an argument and another with three arguments

  • The version without an argument locks the entire file.
  • The version with three arguments accepts the starting position of the region to lock, the number of bytes to lock, and a boolean flag to indicate if the lock is shared. The isShared() method of the FileLock object returns true if the lock is shared; otherwise, it returns false.


Different ways of obtaining locks on a file
The exception handling code is omitted for readability.

The file region that you lock may not be contained in the range of the file size. Suppose you have a file with a size of 100 bytes. When you request a lock on this file, you can specify that you want to lock a region of this file starting at byte 11 and covering 5000 bytes. Note that this file contains only 100 bytes; you are locking 5000 bytes. In such a case, if the file size grows beyond 100 bytes, your lock covers the additional region of the file. Suppose you locked 0 to 100 bytes of a 100-byte file. If this file grows to 150 bytes, your lock does not cover the last 50 bytes that was added after you acquired the lock.


The lock() and tryLock() methods of the FileChannel object, where you do not specify any argument, lock a region from 0 to Long.MAX_VALUE of the file. The two method calls fc.lock() and fc.lock(0, Long.MAX_VALUE, false) have the same effect


How to release the lock
When you are done with the file lock, you need to release it by using the release() method. 
A file lock is released in three ways:
by calling its release() method, by closing the file channel it is obtained from, and by shutting down the JVM. It is good practice to use a try-catch-finally block to acquire and release a file lock as follows:


Example
In this example, two thread will try to acquire the lock on the same file.

Sample output
File is locked by Thread-0
Thread-1 tried to acquire the lock
lock is released by Thread-0


If you know anyone who has started learning Java, why not help them out! Just share this post with them.Thanks for studying today!...

Wednesday, July 29, 2015

How to Read and Write from RandomAccessFile in Java

A FileInputStream lets you read data from a file whereas a FileOutputStream lets you write data to a file. A random access file is a combination of both. Using a random access file, you can read from a file as well as write to the file. Reading and writing using the file input and output streams are a sequential process. Using a random access file, you can read or write at any position within the file (hence the name random access). In this article, we'll try to see how to use RandomAccessFile with the help of an example.


An object of the RandomAccessFile class facilitates the random file access. It lets you read/write bytes and all primitive types values to a file. It also lets you work with strings using its readUTF() and writeUTF() methods. The RandomAccessFile class is not in the class hierarchy of the InputStream and OutputStream classes

Access Mode of Random access file
A random access file can be created in four different access modes. In its constructor, you must specify the access mode. The access mode value is a string. They are listed as follows:

  1. "r" : The file is opened in a read-only mode. You will receive an IOException if you attempt to write to the file.
  2. "rw" : The file is opened in a read-write mode. The file is created if it does not exist.
  3. "rws" : Same as the "rw" mode, except that any modifications to the file’s content and its metadata are written to the storage device immediately.
  4. "rwd" : Same as the "rw" mode, except that any modifications to the file’s content are written to the storage device immediately.

You create an instance of the RandomAccessFile class by specifying the file name and the access mode as shown:

RandomAccessFile raf = new RandomAccessFile("randomtest.txt", "rw");


File Pointer
A random access file has a file pointer that is advanced when you read data from it or write data to it. The file pointer is a kind of cursor where your next read or write will start. Its value indicates the distance of the cursor from the beginning of the file in byes. You can get the value of file pointer by using its getFilePointer() method. When you create an object of the RandomAccessFile class, the file pointer is set to zero, which indicates the beginning of the file. You can set the file pointer at a specific location in the file using the seek() method.

Length function
The length() method of a RandomAccessFile returns the current length of the file. You can extend or truncate a file by using its setLength() method. If you extend a file using this method, the contents of the extended portion of the file are not defined.


Reading from and writing to a random access file is performed the same way you have been reading/writing from/to any input and output streams.


Example 
Following example explain the use of a random access file. When you run this program, it writes two things to a file: the file read counter, which keeps track of how many times a file has been read using this program, and a text message of "Hello Java Latte". The program increments the counter value in the file every time it reads the file. The counter value keeps incrementing when you run this program repeatedly. You may get a different output every time you run this program.

I hope this example has given you the brief notion of Random Access File class and how it works.


If you know anyone who has started learning Java, why not help them out! Just share this post with them.Thanks for studying today!...

Saturday, July 25, 2015

Syntax for Lambda expression in Java

In this article, we try to understand the very basic use of Lambda expression with syntax and many examples. If you want to look what is Lambda and the basic idea behind it, I encourage to read this my article on the basic. I will try to cover all the basic use of Lambda expression in the tutorial.


Syntax for Lambda Expressions
A lambda expression describes an anonymous function. The general syntax for using lambda expressions is very similar to declaring a method. The general syntax is
A lambda expression consists of a list of parameters and a body that are separated by an arrow (->).
The list of parameters is declared the same way as the list of parameters for methods. The list of parameters is enclosed in parentheses, as is done for methods.
The body of a lambda expression is a block of code enclosed in braces. Like a method's body, the body of a lambda expression may declare local variables; use statements including break, continue, and return; throw exceptions, etc.

Unlike a method, a lambda expression does not have four parts.

  1. A lambda expression does not have a name
  2. A lambda expression does not have a return type. It is inferred by the compiler from the context of its use and from its body
  3. A lambda expression does not have a throws clause. It is inferred from the context of its use and its body.
  4. A lambda expression cannot declare type parameters. That is, a lambda expression cannot be generic


Basic example to understand Lambda
Lambda expression are invoked via Function Interface.

Function Interface
A functional interface is simply an interface that has exactly one abstract method. The following types of methods in an interface do not count for defining a functional interface:

  • Default methods
  • Static methods
  • Public methods inherited from the Object class

More detail on Function detail.

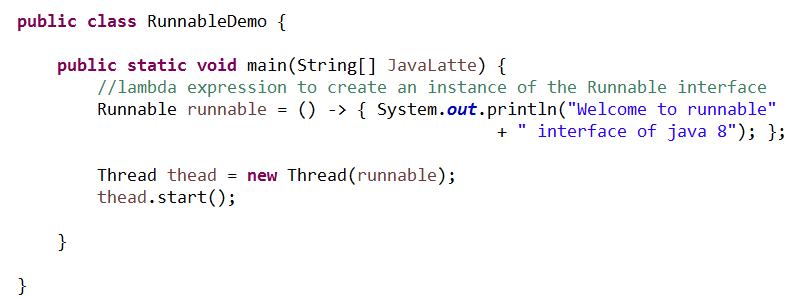
Runnable is an example of Function interface, (check Runnable Java 8 doc) so we can use Runnable interface in term of Lambda expression.
Runnable interface method does not take any input and does not return anything. So it lambda expression will look like
() -> {  statements;  }


Example
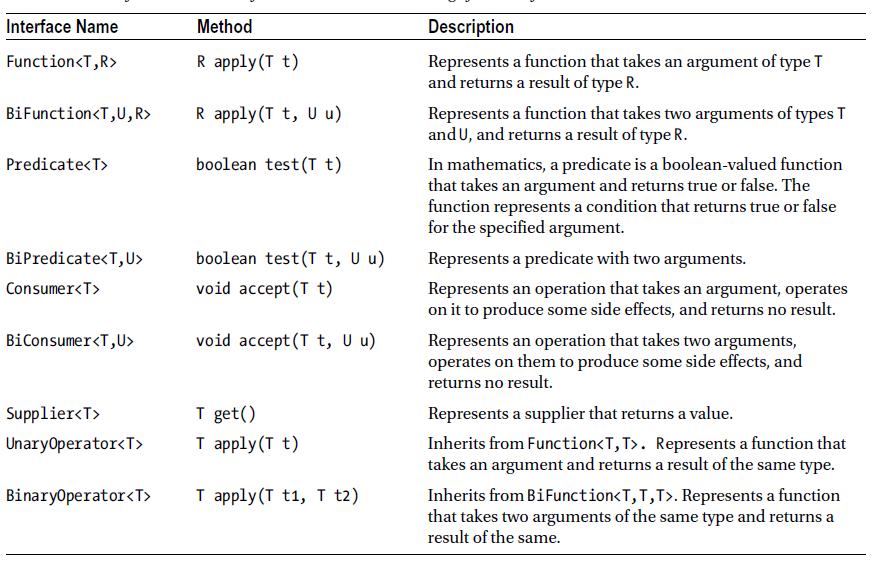
Similarly, Java 8 has many Functional interface for different purpose. Here is the list of commonly used function interface in the package java.util.function


Following table contains some examples of lambda expressions and equivalent methods. I have given a suitable name to methods as you cannot have a method without a name in Java. The compiler infers the return type of lambda expressions.


Example : how to use above lambda expression with function interface.


One of the goals of the lambda expression was to keep its syntax concise and let the compiler infer the details. The following sections discuss the shorthand syntax for declaring lambda expressions.


Omitting Parameter Types
You can omit the declared type of the parameters. The compiler will infer the types of parameters from the context in which the lambda expression is used

// Types of parameters are declared
(int x, int y) -> { return x + y; }

// Types of parameters are omitted
(x, y) -> { return x + y; }

If you omit the types of parameters, you must omit it for all parameters or for none. You cannot omit for some and not for others. The following lambda expression will not compile because it declares the type of one parameter and omits for the other:

// A compile-time error
(int x, y) -> { return x + y; }


Declaring a Single Parameter
Sometimes a lambda expression takes only one parameter. You can omit the parameter type for a single parameter lambda expression as you can do for a lambda expression with multiple parameters. You can also omit the parentheses if you omit the parameter type in a single parameter lambda expression. The following are three ways to declare a lambda expression with a single parameter:

// Declares the parameter type
(String msg) -> { System.out.println(msg); }

// Omits the parameter type
(msg) -> { System.out.println(msg); }

// Omits the parameter type and parentheses
msg -> { System.out.println(msg); }

The parentheses can be omitted only if the single parameter also omits its type. The following lambda expressionwill not compile:

// Omits parentheses, but not the parameter type, which is not allowed.
String msg -> { System.out.println(msg); }


Declaring No Parameters
If a lambda expression does not take any parameters, you need to use empty parentheses.

// Takes no parameters
() -> { System.out.println("Hello"); }

It is not allowed to omit the parentheses when the lambda expression takes no parameter. The following declaration will not compile:

-> { System.out.println("Hello"); }


Parameters with Modifiers
You can use modifiers, such as final, in the parameter declaration for explicit lambda expressions. The following two lambda expressions are valid:

(final int x, final int y) -> { return x + y; }

(int x, final int y) -> { return x + y; }

The following lambda expression will not compile because it uses the final modifier in parameter declarations, but omits the parameter type:
(final x, final y) -> { return x + y; }


Declaring Body of Lambda Expressions
The body of a lambda expression can be a block statement or a single expression. A block statement is enclosed in braces; a single expression is not enclosed in braces
When a block statement is executed the same way as a method’s body. A return statement or the end of the body returns the control to the caller of the lambda expression.

When an expression is used as the body, it is evaluated and returned to the caller. If the expression evaluates to void, nothing is returned to the caller. The following two lambda expressions are the same; one uses a block statement and the other an expression

// Uses a block statement. Takes two int parameters and returns their sum.
(int x, int y) -> { return x + y; }

// Uses an expression. Takes a two int parameters and returns their sum.
(int x, int y) -> x + y

The following two lambda expressions are the same; one uses a block statement as the body and the other an expression that evaluates to void:

// Uses a block statement
(String msg) -> { System.out.println(msg); }

// Uses an expression
(String msg) -> System.out.println(msg)

Check out this link for more examples


If you know anyone who has started learning Java, why not help them out! Just share this post with them.Thanks for studying today!...

How to create thread in Java 8

In this article, we'll see a new way to create thread in Java 8 and also revise the basic two ways to create thread with the help of lambda expression. Main focus of the topic is method reference and how to use thread with lambda expression. If you want to revise the basic concept of thread check this post and this post for lambda concept.


Creating a Thread in Java

The Java API makes it easy to work with threads. It lets you represent a thread as an object. An object of the  java.lang.Thread class represents a thread. Creating and using a thread in Java is as simple as creating an object of the Thread class and using that object in a program. Let’s start with the simplest example of creating a thread in Java. There are at least two steps involved in working with a thread:

  1. Creating an object of the Thread class
  2. Invoking the start() method of the Thread class to start the thread

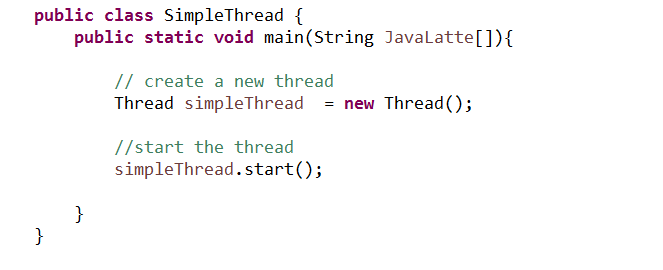
Creating an object of the Thread class is the same as creating an object of any other classes in Java. In its simplest form, you can use the default constructor of the Thread class to create a Thread object.
// create a new thread
Thread simpleThread  = new Thread();

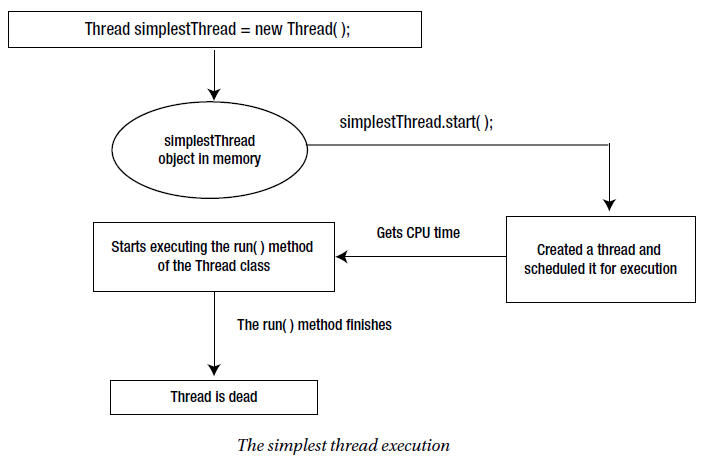
Creating an object of the Thread class allocates memory for that object on the heap. It does not start or run the thread. After you have created an object of the Thread class, you must call its start() method to start the thread represented by that object.
//start the thread
simpleThread.start();


Example 
The start() method returns after doing some housekeeping work. It puts the thread in the runnable state. In this state, the thread is ready to receive the CPU time. Note that invoking the start() method of a Thread object does not guarantee “when” this thread will start getting the CPU time. That is, it does not guarantee when the thread will start running. It just schedules the thread to receive the CPU time.


Three ways to create thread
There are three ways you can specify your code to be executed by a thread

  1. By inheriting your class from the Thread class
  2. By implementing the Runnable interface in your class
  3. By using the method reference to a method that takes no parameters and returns void


Inheriting Your Class from the Thread Class
When you inherit your class from the Thread class, you should override the run() method and provide the code to be executed by the thread.


Implementing the Runnable Interface
You can create a class that implements the java.lang.Runnable interface. Runnable is a functional interface and it is declared as follows

@FunctionalInterface
public interface Runnable


Using a Method Reference
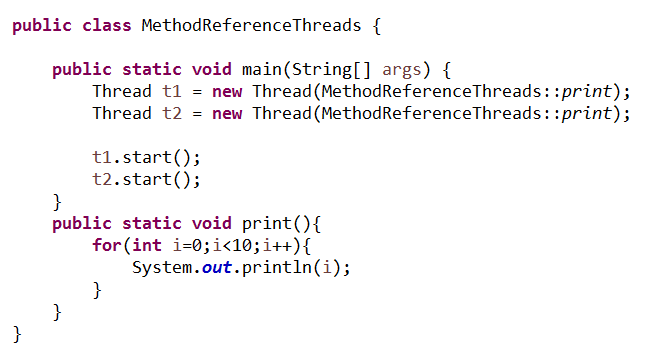
Check this post for detail on method reference. From Java 8, you can use the method reference of a method of any class that takes no parameters and returns void as the code to be executed by a thread.

The following code declares a ThreadTest class that contains an execute() method. The method contains the code to be executed in a thread.


The thread will execute the code contained in the execute() method of the ThreadTest class

Final example


If you know anyone who has started learning Java, why not help them out! Just share this post with them.Thanks for studying today!...

Tuesday, July 21, 2015

DelayQueue class and Delayed interface example in Java

In this article, we look into one of the implementations in java.util.concurrent support the extended BlockingQueue interface, that defines blocking versions of put and take i.e, DelayQueue.  An unbounded blocking queue of Delayed elements, in which an element can only be taken when its delay has expired. We'll try to understand the concept of DelayQueue class and Delayed interface with the help of example.


What is DelayQueue?
An unbounded blocking queue of Delayed elements, in which an element can only be taken when its delay has expired. In this class, you can store elements with an activation date. The methods that return or extract elements of the queue will ignore those elements whose data is in the future. They are invisible to those methods. Here Delayed elements are those elements who implements Delayed interface.


What is Delayed Interface?
A mix-in style interface for marking objects that should be acted upon after a given delay.

This interface allows you to work with delayed objects, so you will implement the activation date of the objects stored in the DelayedQueue class as the time remaining until the activation date. This interface forces to implement the following two methods

  • compareTo(Delayed o): The Delayed interface extends the Comparable interface. This method will return a value less than zero if the object that is executing the method has a delay smaller than the object passed as a parameter, a value greater than zero if  the object that is executing the method has a delay bigger than the object passed as a parameter, and the zero value if both objects have the same delay.
  •  getDelay(TimeUnit unit): This method has to return the time remaining until the activation date in the units is specified by the unit parameter. The TimeUnit class is an enumeration with the following constants: DAYS, HOURS, MICROSECONDS, MILLISECONDS, MINUTES, NANOSECONDS, and SECONDS.

The head of the queue is that Delayed element whose delay expired furthest in the past. If no delay has expired there is no head and poll will return null. Expiration occurs when an element's getDelay(TimeUnit.NANOSECONDS) method returns a value less than or equal to zero. Even though unexpired elements cannot be removed using take or poll, they are otherwise treated as normal elements. This queue does not permit null elements.


Example
In this example, you will learn how to use the DelayedQueue class storing in it some events with different activation dates

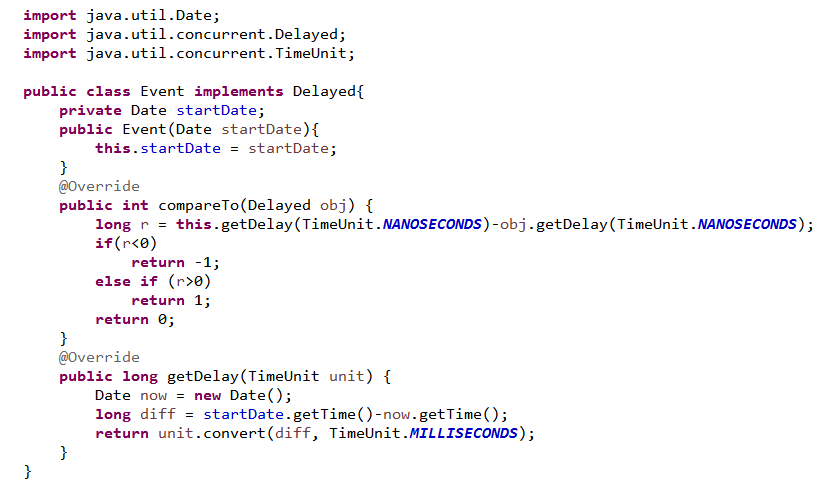
we have implemented the Event class. That class has a unique attribute, the activation date of the events, and implements the Delayed interface, so you can store Event objects in the DelayedQueue class.


The getDelay() method returns the number of nanoseconds between the activation date and the actual date. Both dates are objects of the Date class. You have used the getTime() method that returns a date converted to milliseconds and then, you have converted that value to TimeUnit received as a parameter. The DelayedQueue class works in nanoseconds, but at this point, it's transparent to you.

The compareTo() method returns a value less than zero if the delay of the object executing the method is smaller than the delay of the object passed as a parameter, a value greater than zero if the delay of the object executing the method is bigger than the delay of the object passes as a parameter, and the value 0 if both delays are equal.


This class has an integer attribute named id. When a Task object is executed, it adds a number of seconds equal to the ID of the task to the actual date and that is the activation date of the events stored by this task in the DelayedQueue class. Each Task object stores 10 events in the queue using the add() method.

Finally, in the main() method of the Main class, you have created sixTask objects and executed them in the corresponding threads. When those threads finish their execution, you have written to the console all the events using the poll() method. That method retrieves and removes the first element of the queue. If the queue does not have any active element, the method returns the null value. You called the poll() method and if it returns an Event class, you increment a counter. When the poll() method returns the null value, you write the value of the counter in the console and put the thread to sleep during half a second to wait for more active events. When you have obtained the 500 events stored in the queue, the execution of the program finishes


You can see how the program only gets 10 events when it is activated.

The DelayQueue class has other interesting methods, which are as follows:

  • clear(): This method removes all the elements of the queue.
  • offer(E e): E represents the class used to parameterize the DelayQueue class. This method inserts the element passed as a parameter in the queue.
  • peek(): This method retrieves, but doesn't remove the first element of the queue.
  • take(): This method retrieves and removes the first element of the queue. If there aren't any active elements in the queue, the thread that is executing the method will be blocked until the thread has some active elements.


If you know anyone who has started learning Java, why not help them out! Just share this post with them. Thanks for studying today!...
Friday, April 3, 2015

newFixedThreadPool, Callable and Future example in Java

In this article, we will learn how to implement tasks that return a result and run them on an executor using Callable and Future interfaces with the help Executor framework. This post is continuation of previous post where we learned about cached Thread pool

One of the advantages of the Executor framework is that you can run concurrent tasks that return a result. The Java Concurrency API achieves this with the following two interfaces:

  • Callable: This interface has the call() method. In this method, you have to implement the logic of a task. The Callable interface is a parameterized interface, meaning you have to indicate the type of data the call() method will return.
  • Future: This interface has some methods to obtain the result generated by a Callable object and to manage its state


Create a class named FactCalculator that implements the Callable interface parameterized with the Integer type


Implement the Main class


Output

  Number of completed task : 0
  Task 0 status : false
  Task 1 status : false
  Task 2 status : false
  Task 3 status : false
  Task 4 status : false
  Task 5 status : false
  Task 6 status : false
  Task 7 status : false
  Task 8 status : false
  Task 9 status : false
  Number of completed task : 1
  Task 0 status : true
  Task 1 status : false
  Task 2 status : false
  Task 3 status : false
  Task 4 status : false
  Task 5 status : false
  Task 6 status : false
  Task 7 status : false
  Task 8 status : false
  Task 9 status : false
  Number of completed task : 2
  Task 0 status : true
  Task 1 status : true
  Task 2 status : true
  Task 3 status : false
  Task 4 status : false
  Task 5 status : false
  Task 6 status : false
  Task 7 status : false
  Task 8 status : false
  Task 9 status : false
  Number of completed task : 3
  Task 0 status : true
  Task 1 status : true
  Task 2 status : true
  Task 3 status : false
  Task 4 status : false
  Task 5 status : false
  Task 6 status : false
  Task 7 status : false
  Task 8 status : false
  Task 9 status : false
  Number of completed task : 3
  Task 0 status : true
  Task 1 status : true
  Task 2 status : true
  Task 3 status : true
  Task 4 status : false
  Task 5 status : false
  Task 6 status : false
  Task 7 status : false
  Task 8 status : false
  Task 9 status : false
  Number of completed task : 4
  Task 0 status : true
  Task 1 status : true
  Task 2 status : true
  Task 3 status : true
  Task 4 status : false
  Task 5 status : false
  Task 6 status : false
  Task 7 status : false
  Task 8 status : false
  Task 9 status : false
  Number of completed task : 4
  Task 0 status : true
  Task 1 status : true
  Task 2 status : true
  Task 3 status : true
  Task 4 status : true
  Task 5 status : false
  Task 6 status : false
  Task 7 status : false
  Task 8 status : false
  Task 9 status : false
  Number of completed task : 6
  Task 0 status : true
  Task 1 status : true
  Task 2 status : true
  Task 3 status : true
  Task 4 status : true
  Task 5 status : false
  Task 6 status : true
  Task 7 status : false
  Task 8 status : false
  Task 9 status : false
  Number of completed task : 6
  Task 0 status : true
  Task 1 status : true
  Task 2 status : true
  Task 3 status : true
  Task 4 status : true
  Task 5 status : true
  Task 6 status : true
  Task 7 status : true
  Task 8 status : false
  Task 9 status : false
  Number of completed task : 8
  Task 0 status : true
  Task 1 status : true
  Task 2 status : true
  Task 3 status : true
  Task 4 status : true
  Task 5 status : true
  Task 6 status : true
  Task 7 status : true
  Task 8 status : false
  Task 9 status : false
  Number of completed task : 8
  Task 0 status : true
  Task 1 status : true
  Task 2 status : true
  Task 3 status : true
  Task 4 status : true
  Task 5 status : true
  Task 6 status : true
  Task 7 status : true
  Task 8 status : false
  Task 9 status : false
  Number of completed task : 8
  Task 0 status : true
  Task 1 status : true
  Task 2 status : true
  Task 3 status : true
  Task 4 status : true
  Task 5 status : true
  Task 6 status : true
  Task 7 status : true
  Task 8 status : false
  Task 9 status : false
  Main result : 
  Result of Task: 0 2
  Result of Task: 1 120
  Result of Task: 2 6
  Result of Task: 3 720
  Result of Task: 4 362880
  Result of Task: 5 362880
  Result of Task: 6 2
  Result of Task: 7 24
  Result of Task: 8 40320
  Result of Task: 9 40320


How it works...
In this example, we have learned how to use the Callable interface to launch concurrent tasks that return a result. You have implemented the FactorialCalculator class that implements the Callable interface with Integer as the type of the result. Hence, it returns before type of the call() method.
The other important point of this example is in the Main class. You send a Callable object to be executed in an executor using the submit() method. This method receives a Callable object as a parameter and returns a Future object that you can use with two main objectives

  • You can control the status of the task: you can cancel the task and check if it has finished. For this purpose, you have used the isDone() method to check if the tasks had finished.
  • You can get the result returned by the call() method. For this purpose, you have used the get() method. This method waits until the Callable object has finished the execution of the call() method and has returned its result. If the thread is interrupted while the get() method is waiting for the result, it throws an InterruptedException exception. If the call() method throws an exception, this method throws an ExecutionException exception.

There's more...
When you call the get() method of a Future object and the task controlled by this object hasn't finished yet, the method blocks until the task finishes. The Future interface provides another version of the get() method.


get(long timeout, TimeUnit unit): This version of the get method, if the result of the task isn't available, waits for it for the specified time. If the specified period of time passes and the result isn't yet available, the method returns a null value. The TimeUnit class is an enumeration with the following constants: DAYS, HOURS, MICROSECONDS, MILLISECONDS, MINUTES, NANOSECONDS, and SECONDS.


That's all. Thanks for reading this and if you found this article useful, I would like to see your appreciation in the form of comments.


If you know anyone who has started learning Java, why not help them out! Just share this post with them. Thanks for studying today!...

Thursday, April 2, 2015

newCachedThreadPool example in Java

The first step to work with the Executor framework is to create an object of the ThreadPoolExecutor class. You can use the four constructors provided by that class or use a factory class named Executors that creates ThreadPoolExecutor. Once you have an executor, you can send Runnable or Callable objects to be executed. 
In this  article, you will learn how these two operations implement an example that will simulate a server processing requests from various clients. Before that you can have an overview of Executor frameworks in my previous article.


First, you have to implement the tasks that will be executed by the server. Create a class named Task that implements the Runnable interface


Now, implement the CachedPoolServer class that will execute every task it receives using an executor


Finally, implement the main class of the example by creating a class named Main and implement the main() method


How it works...
The main part of this example is the CachedPoolServer class. This class creates and uses ThreadPoolExecutor to execute tasks

The first important point is the creation of ThreadPoolExecutor in the constructor of the Server class. The ThreadPoolExecutor class has four different constructors but, due to their complexity, the Java concurrency API provides the Executors class to construct executors and other related objects. Although we can create  threadPoolExecutor directly using one of its constructors, it's recommended to use the Executors class.

In this case, you have created a cached thread pool using the newCachedThreadPool() method. This method returns an ExecutorService object, so it's been cast to ThreadPoolExecutor to have access to all its methods. The cached thread pool you have created creates new threads if needed to execute the new tasks, and reuses the existing ones if they have finished the execution of the task they were running, which are now available. The reutilization of threads has the advantage that it reduces the time taken for thread creation. The cached thread pool has, however, a disadvantage of constant lying threads for new tasks, so if you send too many tasks to this executor, you can overload the system

Tip
Use the executor created by the newCachedThreadPool() method only when you have a reasonable number of threads or when they have a short duration.

Once you have created the executor, you can send tasks of the Runnable or Callable type for execution using the execute() method. In this case, you send objects of  the Task class that implements the Runnable interface.

We also have printed some log messages with information about the executor. Specifically, you have used the following methods:

  • getPoolSize(): This method returns the actual number of threads in the pool of the executor
  • getActiveCount(): This method returns the number of threads that are executing tasks in the executor.
  • getCompletedTaskCount(): This method returns the number of tasks completed by the executor


One critical aspect of the ThreadPoolExecutor class, and of the executors in general, is that you have to end it explicitly. If you don't do this, the executor will continue its execution and the program won't end. If the executor doesn't have tasks to execute, it continues waiting for new tasks and it doesn't end its execution. A Java application won't end until all its non-daemon threads finish their execution, so, if you don't terminate the executor, your application will never end.


To indicate to the executor that you want to finish it, you can use the shutdown() method of the ThreadPoolExecutor class. When the executor finishes the execution of all pending tasks, it finishes its execution. After you call the shutdown() method, if you try to send another task to the executor, it will be rejected and the executor will throw a RejectedExecutionException exception. The following screenshot shows part of one execution of this example:


There's more...
The ThreadPoolExecutor class provides a lot of methods to obtain information about its status. We used in the example the getPoolSize(), getActiveCount(), and getCompletedTaskCount() methods to obtain information about the size of the pool, the number of threads, and the number of completed tasks of the executor. You can also use the getLargestPoolSize() method that returns the maximum number of threads that has been in the pool at a time.

  • shutdownNow(): This method shut downs the executor immediately. It doesn't execute the pending tasks. It returns a list with all these pending tasks. The tasks that are running when you call this method continue with their execution, but the method doesn't wait for their finalization.
  • isTerminated(): This method returns true if you have called the shutdown() or shutdownNow() methods and the executor finishes the process of shutting it down.
  • isShutdown(): This method returns true if you have called the shutdown() method of the executor.
  • awaitTermination(long timeout, TimeUnit unit): This method blocks the calling thread until the tasks of the executor have ended or the timeout occurs. The TimeUnit class is an enumeration with the following constants: DAYS, HOURS, MICROSECONDS, MILLISECONDS, MINUTES, NANOSECONDS, and SECONDS


That's all. Thanks for reading this and if you found this article useful, I would like to see your appreciation in the form of comments.


If you know anyone who has started learning java, why not help them out! Just share this post with them. Thanks for studying today!...